Taho!

Luise is already 8 months… that means that I my last post was 8 months ago!

I chose to spend my time with the kids after work and on weekends that writing here have been somewhat ignored. The kids are growing up really fast! And because I will not be able to bring back time and I definitely don’t want to miss on their precious milestones, hubby and I decided that I quit my job and be a stay-at-home-mom.

P1150167-s

Aren’t they adorable?! Being a SAHM means having more time playing with them, fully breastfeeding the little chubby one, and more time for my kitchen experiments and DIY projects too! I’m actually excited that I will get to do what I really love, that my projects for the next months are already lined up. If all goes well, I will be sharing them with you.

Oh, I have also started to do meal planning and doing my grocery list weekly to save some money, since we’re now living on a single income. And first one on my breakfast list is my favorite, Taho! It’s silken tofu with brown sugar syrup and sago pearls. It’s usually peddled on the streets in the Philippines and the peddler would call out “TAHOOOOOOO!!!!”.

magtataho

Photo source: Magtataho

There is something similar here in Singapore, but it does not have the same sweetness which I miss. So I decided to make one, and I never thought that it’s actually very easy! Recipe adapted from Panlasang Pinoy.

Filipino Taho

Ingredients:

  • 600g extra soft tofu
  • 1 1/4 cup brown sugar
  • 1/2 cup uncooked sago pearls
  • 4 1/2 cups water

Procedure:

  • Boil 4 cups of water. Put in sago pearls and cook in medium heat until transparent (I used small sago pearls and it took about 10-15 minutes to cook). Add 1/4 cup brown sugar and mix well. Turn off heat and set aside. Let it cool to room temperature.
  • Boil 1/2 cup of water. Add 1 cup brown sugar, mix well, and simmer till mixture becomes thick. Set aside.
  • Transfer tofu in a mug and heat in the microwave oven for a minute.
  • Top the tofu with brown sugar syrup and sago pearls.
  • Serve warm and enjoy!

For this, I used silken tofu which actually did not work for me. It should be softer and silkier, like melt-in-your-mouth soft. So a quick solution was I bought the Singapore version and added my syrup and pearls. Yummy!

What is your favorite childhood breakfast?

DIY: Bean bag

We had one 3-day weekend in September, and how did I make it a productive one? I wiped the dust off my abandoned sewing machine and had it running! This time, I made a bean bag, or pouf (whatever you want to call it), out of S$3.90 floor rugs from Ikea. The kiddo loves it!

beanbag

Click here for the nicely detailed instructions on how to make it.

Thanks for dropping by!

Alexa’s Mom

Alexa Turned Two

My little girl, Alexa, has turned two (last month — another late post)! Time flies just like that! We also had welcomed our new bundle of joy, Luise, a few weeks back. Hello, sleepless nights!

Just like Alexa’s first birthday, we had another DIY party for her. But she had fun this time because her friends were there too! We did not have any games like other children’s parties (due to my poor hosting skills and space constraints), but we had lots of food, non-stop Barney videos, and kids running around, laughing, and screaming. It was such a fun chaos!

Now let me share with you my labor of love for Alexa for this year…

The cake.

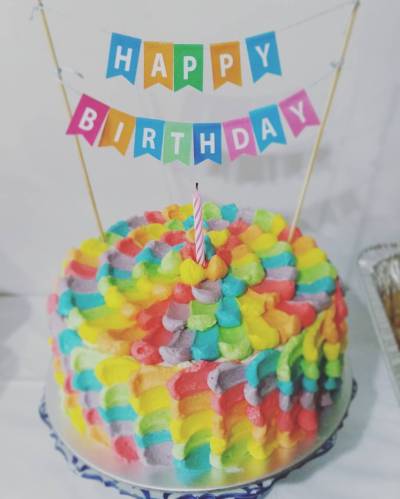
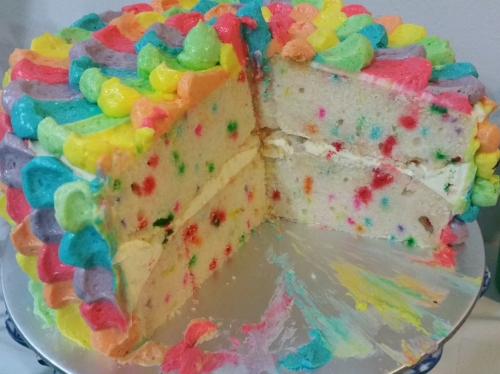
It’s a funfetti white cake with rainbow petal buttercream frosting. I did enjoy doing the frosting. I got both the cake design and cake bunting printable from posts in Pinterest.

cake1

cake2

12074858_10152952739430876_7611765512122995656_n

The cupcakes.

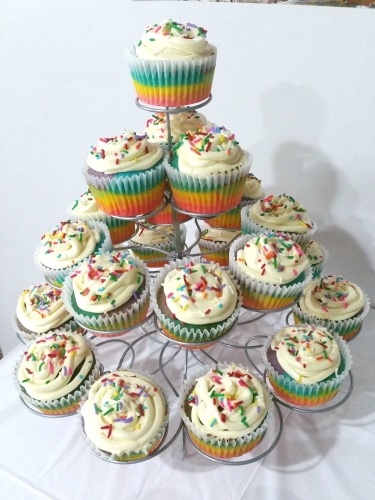
They are rainbow cupcakes with cream cheese frosting and rainbow rice sprinkled on top, also from a post in Pinterest.

cupcakes

May this year be as colorful as these cakes for our first princess.

Thanks for dropping by!

Alexa’s Mom

Strawberry Oatmeal Bars

Baguio is known to be the “summer capital of the Philippines” because of its cool climate, perfect for escaping the scorching heat of Manila. It is also popular for the fresh vegetables, fruits, and flowers that you can get from their markets.

I have been to Baguio twice. I always wanted to go back there but it would require at least three whole days (out of my usual 9-10 days vacation in Manila) because of the 8-hour drive from Manila to Baguio, and another 8 hours back. So that’s 16 hours of travel!

Strawberry-picking is one of the activities I would like to try. It would definitely be a great experience to harvest fresh strawberries and not just get them from the supermarkets packed in plastic boxes.

Just recently, my friend brought home some strawberry preserves for me. I am not fond of jams and preserves, but thinking about the farmers who harvested those strawberries and made them into preserves to earn a living, it would be heartbreaking to let it go to waste. So again, being the “I hate to see food go to waste” person that I am, I needed to find a recipe to put it to good use…

Strawberry Oatmeal Bars

Adapted from The Pioneer Woman

Ingredients: 

  • 1 3/4 stick cold butter, cut into small pieces
  • 1 1/2 cup plain flour
  • 1 1/2 cup oats (quick or regular)
  • 1 cup packed brown sugar
  • 1 tsp baking powder
  • 1/4 tsp salt
  • 1 jar (10-12 oz) strawberry preserves

Procedure:

  • Preheat the oven to 175 C. Butter a 9 x 13 or 8 x 10 baking dish.
  • Mix together the flour, oats, brown sugar, baking powder, and salt.
  • Cut in the butter with a pastry cutter (or in my case, a fork!) until it resembles coarse crumbs.
  • Sprinkle half the mixture into the pan and pat lightly to pack it a little tight.
  • Spoon strawberry preserves evenly over the surface, then use a dinner knife to carefully spread it around.
  • Sprinkle the other half of the oat mixture over the top and pat lightly again.
  • Bake until light golden brown on top, about 30 to 40 minutes.
  • Remove from the oven and let cool in pan.
  • When cool, cut into squares and serve.

Now, this one is definitely LOVE! Even the kiddo digged into it! The oatmeal crust was able to balance the sweetness of the strawberry preserve. I guess it would also work with blueberry or peach, depends on what you have in your pantry.

It would be great to pair it up with coffee or tea! (caffeine-free tea for the preggo lady, please!)

Give it a try this weekend… Enjoy!

Thanks for dropping by,

Alexa’s Mom

Leche Flan

I have a confession to make… we are blessed once again with another angel! I am currently on my 18th week and have already passed the rough days (and nights) of nausea, heartburn, and food aversion. Now, we’re just very excited, just like the first time.

Everytime Alexa sees my growing tummy, she would blurt out, “hi baby!” and would give my tummy a kiss and lots of love. She is such a darling, but at times, she can be an unstoppable toddler. She would run here and there, and would (baby) talk or scream nonstop. And that’s why mommy’s often exhausted.

During the weekend, I had more energy.. plus I have eggs and milk in the pantry! So I made leche flan!

Leche flan, also known as caramel custard, is one of the top desserts in the Philippines. I remember my lolo (grandfather) who used to make leche flan for his grandchildren, and my sister who would unselfishly save a very big piece for herself!

Leche Flan

Ingredients:

  • 10 egg yolks
  • 1 small can condensed milk
  • 1 can evaporated milk
  • 1 tsp vanilla extract
  • granulated sugar

Procedure:

  • Beat all egg yolks in a big bowl with a fork or egg beater.
  • Add condensed milk and mix thoroughly.
  • Pour in evaporated milk and vanilla extract. Mix well and set aside. (You can strain the mixture using cheesecloth or a fine strainer to make a smooth leche flan)
  • Put about 2 tbsp sugar in the mold (llanera). Place over the stove and heat over low fire until the sugar turns to caramel (light brown liquid). Spread the caramel evenly on the mold. Let cool a bit, about 5 minutes. (For the mold, I used three 8 x 4 inches aluminum loaf pan)
  • Pour the egg and milk mixture on top of the cooled caramel. Cover the mold with aluminum foil.
  • Steam for 30-35 minutes. After steaming, let the temperature cool down then refrigerate.
  • Serve for dessert.

It is so delish as much as it looks good on the photo, I swear! And it is so easy to prepare.

My sister has already requested me to make some leche flan for her when she comes over next month. She will have the whole llanera for herself!

Thanks for dropping by!

Alexa’s Mom

Banana Muffins

Whenever we have some overripe bananas in the office, I bring them home and make some muffins. I hate to see food go to waste!

Banana Muffins

Ingredients:

  • 1 1/2 cups plain flour
  • 1 tsp baking powder
  • 1 tsp baking soda
  • 1/2 tsp salt
  • 3 large bananas, mashed
  • 3/4 cup white sugar
  • 1 egg
  • 1/3 cup butter, melted

Procedure:

  • Preheat oven to 350F (175C). Coat muffin pans with non-stick spray, or use paper liners.
  • Sift together the flour, baking powder, baking soda, and salt; set aside.
  • Combine bananas, sugar, egg, and melted butter in a large bowl. Fold in flour mixture, and mix until smooth. Optional: Add chocolate chips and/or walnuts, according to your heart’s desire.
  • Scoop into muffin pans and bake in preheated oven. Bake mini muffins for 10 to 15 minutes, and large muffins for 25 to 30 minutes. Muffins will spring back when lightly tapped.

Isn’t it pretty? It’s yum too!

Enjoy!

Love,

Alexa’s Mom

Chia Seeds as Egg Substitute

Hello there!

Holidays had passed and now it’s already February of 2015! January just flew by like that.

And because the holidays have made us gain those extra pounds, I want to try my best to eat healthier starting this new year. I thought of replacing some of my baking ingredients with healthy alternatives, like mashed avocado for butter, applesauce for sugar, or chia seeds for eggs.

I started off with replacing eggs with chia seeds. I saw it before on TV and in Pinterest but never really looked into it. Who would have thought that these tiny seeds have such great nutritional value! Here are 10 reasons why you should add chia seeds to your diet:

Combat Diabetes

Chia is being studied as a potential natural treatment for type-2 diabetes because of its ability to slow down digestion. The gelatinous coating chia seeds develops when exposed to liquids-can also prevent blood sugar spikes.

Get More Fibre
Just a 28-gram or one-ounce serving of chia has 11 grams of dietary fibre — about a third of the recommended daily intake for adults. Adding some chia to your diet is an easy way to make sure you’re getting a good amount of fibre, which is important for digestive health.

Stock Up On Omega-3
Chia seeds are packed with omega-3 fatty acids, with nearly five grams in a one-ounce serving. These fats are important for brain health. “There’s better conversion of omega 3s into the plasma or into the food than with flax seed,” said researcher Wayne Coates.

Stronger Teeth And Bones
A serving of chia seeds has 18 per cent of the recommended daily intake for calcium, which puts your well on your way to maintaining bone and oral health, and preventing osteoporosis.

Don’t Forget Manganese
Manganese isn’t a well-known nutrient, but it’s important for our health: it’s good for your bones and helps your body use other essential nutrients like biotin and thiamin. One serving of chia seeds, or 28 grams, has 30 per cent of your recommended intake of this mineral.

Plenty Of Phosphorus
With 27 per cent of your daily value for phosphorus, chia seeds also helps you maintain healthy bones and teeth. Phosphorus is also used by the body to synthesize protein for cell and tissue growth and repair.

Pack In The Protein
Chia seeds also make a great source of protein for vegetarians and don’t have any cholesterol. One 28-gram serving of these super seeds has 4.4 grams of protein, nearly 10 per cent of the daily value.

Fight Belly Fat
Chia’s stabilizing effect on blood sugar also fights insulin resistance which can be tied to an increase in belly fat, according to Live Strong. This type of resistance can also be harmful for your overall health.

Get Full. Faster
Tryptophan, an amino acid found in turkey, is also found in chia seeds. While tryptophan is responsible for that strong urge to nap after a big Thanksgiving dinner for example, it also helps regulate appetite, sleep and improve mood.

Improve Heart Health
According to the Cleveland Clinic, chia seeds have been shown to improve blood pressure in diabetics, and may also increase healthy cholesterol while lowering total, LDL, and triglyceride cholesterol. All good news for your ticker!

Now you ask, how can chia seeds replace eggs in your recipe? Very quick and easy!

For one egg, combine 1 tbsp chia seeds with 3 tbsps water in a small bowl. Let it sit for about 15 minutes until it forms a thick gel. You can use this for cookies, cakes, and muffins.

Interesting, isn’t it? I tried this with my oatmeal cookie recipe. I just had to extend the baking time by about 10 minutes as the dough is a bit more moist than the original recipe, but it was good. I couldn’t tell the difference.

If you are not into baking, you can add chia seeds to your smoothie or your breakfast oatmeal for that extra pack of nutrients.

So, don’t forget to grab that bag of chia seeds on your next trip to the supermarket!

Thanks for dropping by,

Alexa’s Mom

Old-Fashioned Cinnamon Rolls

It’s almost Christmas, exactly three weeks from now. Time really flies when you’re having fun, or in my case, when you’re busy.

Having a day job and coming home to a very active toddler who knows that Mommy should be home by 7:30 pm, I’m in luck when I escape for an hour or two of me time to do some baking, get a massage, or go to my yoga class.

Just an update, Alexa is now 14 months old. She likes running after other toddlers and baby-talking to them. She had her share of bumps and falls, but she’s a strong little one… she would stand up, and attempt to do it again! *facepalm* .. and oh, she loves toothpaste commercials and brushing her teeth!

Today, I am sharing with you one of my favorite recipes, the Old-Fashioned Cinnamon Rolls from BettyCrocker.com. I have made Cinnamon Scrolls before, but I feel that this is much, much better!

Old-Fashioned Cinnamon Rolls

Ingredients:

Rolls

  • 3 1/2 to 4 cups plain flour
  • 1/3 cup sugar
  • 1 tsp salt
  • 4 1/2 tsp instant dry yeast
  • 1 cup milk
  • 1/4 cup butter or margarine, room temp
  • 1 large egg
  • Cooking spray or oil to grease bowl and pan

Filling

  • 1/2 cup sugar
  • 2 tsp ground cinnamon
  • 1/4 cup butter or margarine, room temp
  • 1/2 cup raisins (if desired)
  • 1/4 cup finely chopped nuts, if desired

Glaze

  • 1 cup powdered sugar
  • 1 tbsp butter or margarine, room temp
  • 1/2 tsp vanilla
  • 1-2 tbsp milk

Procedure:

  • In a large bowl, stir 2 cups of the flour, 1/3 cup granulated sugar, the salt and yeast with a wooden spoon until well mixed.
  • In a 1-quart saucepan, heat the milk over medium heat until very warm (around 45-50°C). Add the warm milk, 1/4 cup butter and egg to the flour mixture. Beat with an electric mixer on low speed 1 minute, stopping frequently to scrape batter from side and bottom of bowl with a rubber spatula, until flour mixture is moistened.
  • With a wooden spoon, stir in enough of the remaining flour, about 1/2 cup at a time, until dough is soft, leaves side of bowl and is easy to handle (dough may be slightly sticky).
  • Sprinkle flour lightly on a countertop or large cutting board. Place dough on floured surface. Knead by folding dough toward you, then with the heels of your hands, pushing dough away from you with a short rocking motion. Move dough a quarter turn and repeat. Continue kneading about 5 minutes, sprinkling surface with more flour if dough starts to stick, until dough is smooth and springy.
  • Spray a large bowl with the cooking spray or wipe with an oiled kitchen towel. Place dough in bowl, turning dough to grease all sides. Cover bowl loosely with plastic wrap; let rise in a warm place about 1 hour 30 minutes or until dough has doubled in size. Dough is ready if an indentation remains when you press your fingertips about 1/2 inch into the dough.
  • In a small bowl, mix 1/2 sugar and the cinnamon, set aside. Grease a 9×13-inch baking pan, set aside.
  • Sprinkle flour lightly on a countertop or large cutting board. Gently push your fist into the dough to deflate it. Pull the dough away from the side of the bowl, and place it on the floured surface.
  • Using your hands or a rolling pin, flatten dough into a 10×15-inch rectangle. Spread 1/4 cup butter over dough to within 1/2 inch of edges. Sprinkle with sugar-cinnamon mixture, raisins and nuts. Beginning at a 15-inch side, roll dough up tightly. Pinch edge of dough into the roll to seal edge. Stretch and shape roll until even and is 15 inches long. Using a sharp serrated knife or length of dental floss, cut roll into 15 (1-inch) slices. Place slices slightly apart in the pan. Cover pan loosely with plastic wrap; let rise in a warm place about 30 minutes or until dough has doubled in size. Remove plastic wrap.
  • Move the oven rack to the middle position of the oven. Heat the oven to 180°C. Bake 30 to 35 minutes or until golden brown. Immediately remove rolls from pan; place right side up on a cooling rack. Cool 5 minutes.
  • In a small bowl, stir glaze ingredients until smooth, adding enough milk so glaze is thin enough to drizzle. Over the warm rolls, drizzle glaze from the tip of a tableware teaspoon, moving the spoon back and forth to make thin lines of glaze. Serve warm.
This recipe yields 15 rolls, but because I stretched the roll longer to make the diameter about 3-inch, I was able to make 30 rolls. The size was just perfect, and I was able to share it with more friends!
Doesn’t it look yummy?
Try it and enjoy!
Love,
Alexa’s Mom

DIY: First Birthday Party

Oh wow! I can’t believe it has been more than 2 months since my last post! Things have been busy at home and in the office. My new job is great so far.

Our dear princess, Alexa, turned ONE year last month. At first, I was hesitant about giving her a party. Reason is, she won’t remember anything about her first birthday. I, myself, only remember my first birthday party through pictures.

Then, looking back at my childhood, our parties are all prepared by my Mom (and we remember her for that!). We don’t have event organizers, 100 or so guest lists, or anything fancy — just homemade food, simple party games, cake blowing and loot bags for the guests. On my 3rd birthday, I had a costume party, with all my friends dressed as super heroes, and myself dressed as a metro aid (street sweeper). It all happened at our humble home.

So I thought, why not I do the same? A party prepared by us, for Alexa, with LOVE!

Everything was DIY.

The cake. It was my first time to make a fondant cake, and I can say it was a success! It is a one layer chocolate cake covered with white homemade marshmallow fondant and the owls and letters are made of store-bought sugar paste.  The owl designs are adapted from YouTube

The decors. Since we’re on a tight budget, I made the decors out of colored paper. Simple yet it has brightened up the living room. Thanks, of course, to Pinterest!

These are photos of her from birth to 1 year. How time flies!

The food. All were home-cooked. We had spaghetti, chicken lollipops, and spring rolls, just as what Mom used to serve our friends during our birthday parties. Of course, we have the dessert table in addition. My sister K from Manila sent over a cake she made especially for Alexa. We called it the “mini me” cake, see why..

Isn’t it pretty? It’s got Alexa’s nose and chubby cheeks!

Here’s the dessert table…

The banner design is a free printable from Pinterest. Sorry for the poor photo quality, the light is too bright outside. Here’s another shot, with the birthday girl.

And the cupcake stand — vanilla cupcakes with buttercream frosting…

We also had chocnut (chocolate + peanut, from Manila), red hotdogs + heart marshmallows, and a bowl of grapes.

It was very simple yet a whole lot of fun! I hope our princess enjoyed herself too.


Thanks for dropping by,

Alexa’s Mom